Adobe Illustrator

Screen Shot 2013-09-27 at 5.06.59 PM

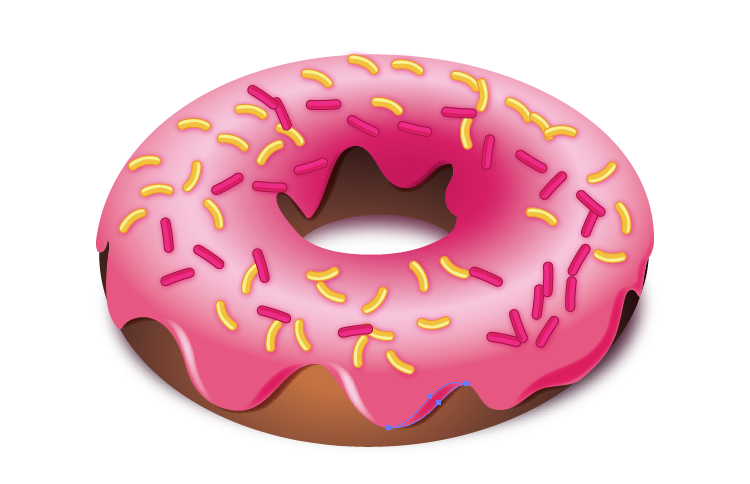
This image of this snail was probably created using a variety of tools in Adobe Illustrator. The basic shapes, such as the orange snail body and the brown shell, were created with the pen tool, focusing on curved lines. The gradient tool was used for the orange fill, since the color is lighter on bottom and darker on top. The ellipse tool created the small yellow ovals on top of the snail, and possibly the larger half-ovals near the grass (these ellipses were just trimmed in half).  The pen tool was used for the orange part of the eyes, and the ellipse tool was probably used for the silver and blue part because the circles are nearly perfect. A blue gradient was used in the eyes, and light ovals created by the ellipse tool inside of the eyes create dimension and light. The pen tool was also used to create all of the small details (like on the snail’s shell and its mouth) and the paint tool was likely used to fill everything in. Since the snail was created with Illustrator, it looks imperfect. However, the imperfections make the image appealing.

http://imgs.steps.dragoart.com/how-to-draw-a-electric-guitar-step-5_1_000000005551_4.jpg

This illustration looks to have been pretty straightforward but at the same time pretty difficult. Since it is black and white, there was no use for color or any sort of gradients. However, using the line tool to create most of the shapes along with the shape tool for the tuning keys and knobs. The creator must have uses the pen tool to create some of the bends in the guitar and help make those tight curves in the body of the guitar. The shape tool was also used to create the pickups on the middle of the guitar along with the little fret markers on the neck of the guitar.

Illustrator Tool

donut

This is a very easy picture to create in Adobe Illustrator CC. The Ellipse tool under the rectangle tool can be used to create the basic shape of the donut. The gradient tool can create the gradient brown color we see on the donut. Besides, the pen tool can help create the irregular shape of the cream on the donut. Then, again, the gradient tool will fill the gradient pink color on the donut. Pencil tool can be used to draw the sprinkles on the donut. Then, it’s easy to fill in colors, create shadows, copy and paste all these sprinkles and put then in the place the designer would like to be.

typewriter illustration

type


For this illustration, it appears that the illustrator may have scanned in some type of textured paper or used a textured paint fill. For the white keys, the illustrator used the shape tool to create perfect circles (the same technique was probably used for the other basic shapes to create the typewriter). For the splitting paper at the top which morphs into data bits, the artist must have used the curved pen tool. For the slanted squares, the illustrator could’ve transformed the squares by pulling on the corners. I like that it is very minimalist and uses simple geometric shapes to create the illustration.

adobe illustrator

illustrator-cs6-patterns-1


This was created in illustrator quite simply. The designer made a number of different sized circles using the shape tool and then chose a number of different colors. They used the fill tool to change the color of the shapes. Then they changed the opacity of each circle so that some appear more transparent than others. The text colors are the same as some of the dots, so everything works together.

Typography

typographic-map-us


I really liked this typographic image of the United States. I thought the font the designer used works with the image because even though the words are crowded, it’s easy to see which state is which. I think the use of only black and white was also smart because had the designer used color, the entire image would have been harder to read.

Typography Design

30-Beautiful-Examples-Of-Typography-Design-30

I find this typographic image particularly interesting because it creates an image using primarily three letters: X,Y, and K and one typeface to compose the image. I think the Serif typeface the designer chose really adds a elegant and fashion feel to the design. In order to create this image, the designer used an array of sizes for the letters, stretched the letters, and flipped them. I find the small x on the women’s check particularly interesting. At first I thought it was a mistake, but then I realized the designer used it as a beauty mark. Another interesting aspect of the design is that the girl has no distinct ears, yet because of the placing of the letters it does not detract from the design. The one thing I did not understand was why the designer chose to have a Y coming off the women’s chin because the chin is already defined without it.

Typography

typography-designs-11I was drawn to this typography design because at first glance you see letters constructed into the shape of a pyramid. Looking closer, the letters form words into the phrase, “Lead us not into war or hate, lead us not into global catastrophes, lead us not into into the future.” The words get bigger as the sentence continues, ending with the word future as the largest in the pyramid. This ties in with the overall look of the type, the letters being formed by constructive lines, as if they could actually form a 3D object. Also, having the black background and clean cut white lines seems futuristic.

Typography Post: Week 4

.I like the design of this using typography because it never says in any of the words what the design actually is. Everyone knows that it’s the super hero character Mario. It does have a lot of words and catchphrases that are related to the Mario franchist, such as “it’s a me!” and “Mama Mia!” and “princess” (which refers to Princess Peach. I know that distortion is a giant no-no in most typography, but it definitely works in the designers favor in this instance. I also think that without coloring in Mario’s shirt and overalls, and the design was all black, it might have been harder to pick up on the fact that this design was indeed Mario the plumber. So, the elements of the design that I like are the distortion and the coloring.

Week 4: Typography

Screen Shot 2013-09-19 at 10.59.55 PM

The intricate design on this “Rip It Up and Start Again” poster relies entirely on typography. Many of the letters have double functions and work in two separate words. For example, the “P” works in both “rip” and “up” and the “A” works in both “start and again” Similarly, bottom stroke of the “I” in “rip” doubles at the top stroke of the “T” in “it.” The double functions work because of the way the words are strategically stacked on each other. Instead of being confusing, though, the design is effective because of the white space and kerning. People can tell that the “P” works with “rip” because it is attached to the “I,” but it also works with “up” because of the tight kerning between the “U” and the “P” and the fact that the bottoms of the two letters line up. I also find it interesting how the letters are different sizes and shapes in order to fit together nicely. The white space also clearly separates the words and provides balance, order and a “clean” look. However, the connections between the letters and tight leading and kerning bring the entire design together.